Approx. 8 minutes read
I used to own a Surface Pro 9 with a SQ3 processor, but I gifted it to my parents.
Today, he was having device compatibility issues – probably due to the lacking drivers for the ARM Windows… – so we agreed to swap devices!
As a result, I have the (nowadays) rare opportunity to set up a fresh development environment for Windows 11.
This Surface Pro 9 will likely just be the machine I use whenever:
- Me and my mentor decide to co-work from one another’s homes.
- Me and the rest of the team have a co-working day in London.
- I’m travelling.
So it needs to be able to do everything I’d normally do on my workstation, just on the go!
Since I’ll need to go through the full reinstallation process, I though I’d document my process for anyone trying to set up a UNIX development environment for Windows!
Installing Windows 11
I’ve decided to install Windows 11 instead of another operating system because:
- I intend to play some visual novels on it.
- It’s the most compatible with the hardware.
- The screen is beautiful and Netflix at 4K is a treat.
- The battery life is great, and I want to keep it that way.
- The Linux experience on Surface devices is not great… and this is
ARMto boot.
My development environment doesn’t really differ much regardless of the host operating system too, so no compromises there.
Choosing your version
There are a few versions of Windows 11 available.
To boil it down, you have:
- Home: The “standard” version, which is what most people will use.
- Pro: The “professional” version, which adds some features:
BitLockerencryption.- Group Policy Management.
Hyper-Vvirtualization.- Windows Sandbox.
- Pro for Workstations: The “workstation” version, doesn’t add much for me.
ReFSfile system support which is cool but…- Faster file sharing over
SMB. - More CPU and RAM support (irrelevant, for me).
- Enterprise: The “business” version, which is not available for consumers.
- It has all the features of
Proand more, but you need a volume license to get it.
- It has all the features of
- Education: The “education” version, which is similar to
Enterprisebut for schools and universities.
Of these, I’d lean towards Pro or Enterprise if you can get it.
One annoying thing about Windows 11 is that it comes with a lot of bloat, ads, and telemetry on practically every version except Enterprise (and maybe Education).
I’ve also had some really bad experiences with mandatory updates.
The amount of times I’ve had my machine forced to restart in the middle of a workday is ridiculous.
Then, my settings get reset, and I have to spend time reconfiguring everything…
Thankfully, as part of the Enterprise version, you can use a variant called LTSC (Long-Term Servicing Channel) which is a version of Windows that:
- Is practically the same as
ProorEnterprise. - Comes with minimal telemetry.
- Has no bloatware (doesn’t even come with the Microsoft Store).
- Only gets security updates, no feature updates.
- Longer support lifecycle (10 years).
- Doesn’t force you to have a Microsoft account.
I highly recommend using LTSC if you can get it.
I wouldn’t recommend using non-official channels to get
LTSC, but you can get an evaluation ISO here.
If you’re interested in getting LTSC, the easiest ways to do that without breaking the bank or relying on unofficial channels are:
- Get a
Volume Licensefrom Microsoft- This is the official way to get it, but you’ll need 5+ licenses.
- Between $300 and $500 per license.
- Buying through a Volume License Reseller
- Get a Cloud Solution Provider Subscription (CSP) from Microsoft ($20-30).
- Get the
IoT Enterprise LTSCversion, which is the same asLTSCbut for IoT devices.- You have to accept the
IoTlicense terms, which are a bit more restrictive. - You can just buy it for a single device.
- Between $100 and $200 per license.
- You have to accept the
Once you have your license, download the ISO. For this post I’ll be using massgrave to get the LTSC ISO for convenience.
If you’re following along on an
ARMdevice, check out these ISOs instead.
Burning the ISO
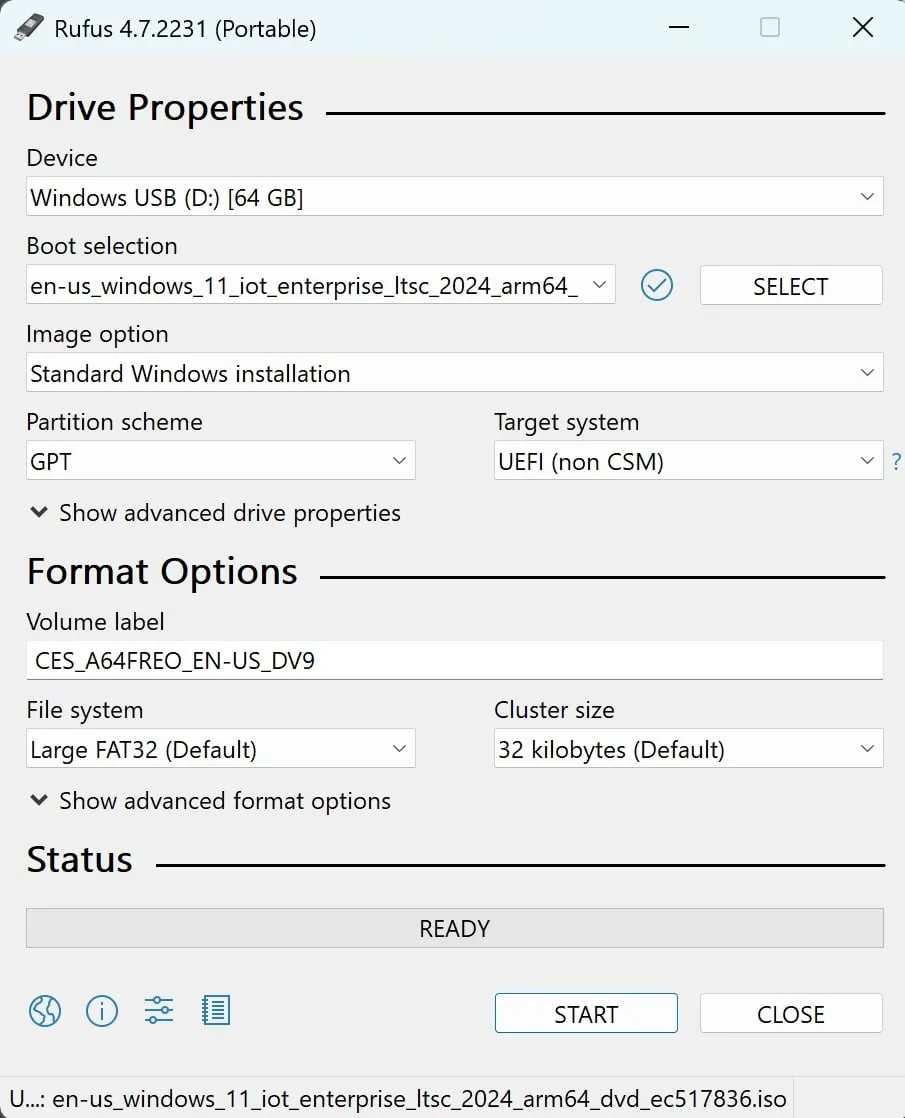
For burning the ISO, I personally recommend using Rufus, which is a free and open-source tool for creating bootable USB drives.
You can install it via winget too if you’re already using Windows:
winget.exe install Rufus.Rufus
Then, once you have it installed, you just:
- Open Rufus.
- Select your USB drive.
- Select the
Windows 11 LTSCISO you downloaded. - Press
Start.
Simple as that!
I’d recommend setting the following options too to make everything just work upon installation:
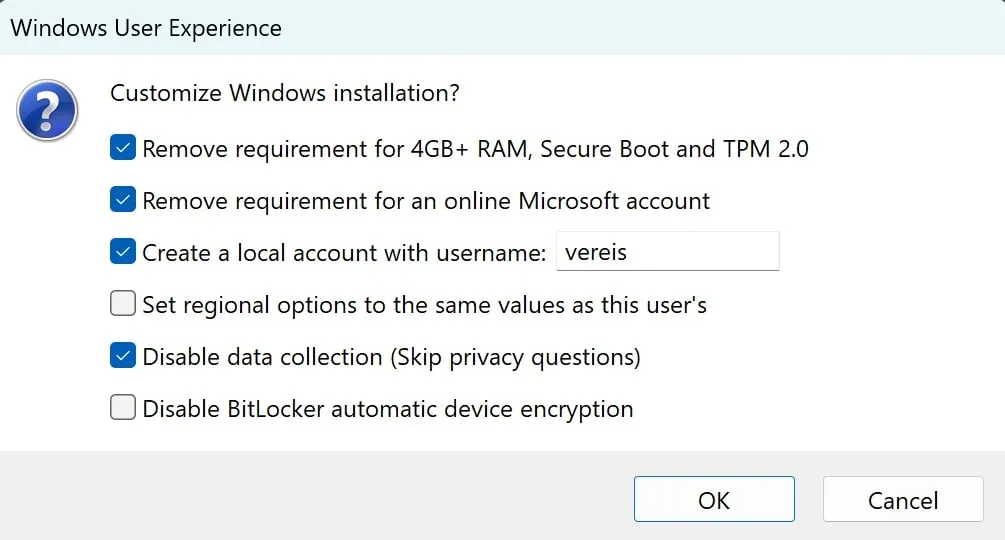
Totally optional, but it makes things easier.
Installation
Find a guide on how to boot into a USB drive on your device.
Once you boot into the USB drive, you’ll be greeted with the Windows 11 installation screen.
Simply follow the prompts from your installer and you’ll have Windows 11 installed in no time!
Note: If you’re on an
ARMdevice, you may need to disableSecure Bootin your BIOS/UEFI settings to boot the installer.
Once the installation is complete, you’ll be prompted to set up your user account and preferences.
After installation, I always recommend making sure you’ve got the latest Windows 11 updates installed before proceeding with any further setup.
Development Environment
Now that we have Windows 11 installed, let’s set up the development environment!
All the tools I use as part of my development environment are CLI or TUI based, so the main choice I need to make is which terminal emulator to use.
Terminal Emulator
Prior to Microsoft releasing Windows Terminal, I used to find the terminal experience on Windows to be quite lacking.
There are a few options such as:
But nowadays, I find that Windows Terminal is the best option for most people.
In my experience,
minttyworks really well, at least it did back in the Cygwin days.My main issue with it is that it doesn’t support terminal padding, which is a must for me.
There may have also been some issues with
Unicodesupport, but I can’t remember exactly.
ConEmuhas a lot of configuration options, but I found performance extremely lacking.
I install the beta version of Windows Terminal via winget:
winget.exe install Microsoft.WindowsTerminal.Preview
Once that’s set up, you can configure it quite easily via pressing Ctrl + , or going to the settings menu.
My only complaint with Windows Terminal is the awkward JSON configuration file, but I just set up padding, choose a font, colorscheme, and I’m good to go.
Windows Subsystem for Linux
I do all my development work in a Linux environment.
Microsoft have a great tool for this called the Windows Subsystem for Linux, or WSL for short.
Think about it like running a super lightweight, well-integrated Linux virtual machine inside of Windows.
You can install it by running:
wsl.exe --install --no-distribution
Note: I’m planning on using
NixOSas my distribution. This isn’t available by default, so I need to install it manually later.Omitting the
--no-distributionflag will install the default distribution, which isUbuntu.
Unfortunately, you need to reboot after installing WSL. Once that’s done, we can move on to installing NixOS!
Installing NixOS
The NixOS WSL project is a community-maintained project that provides a NixOS distribution for WSL.
If you’re following along on an x86_64 machine, you can set it up super easily.
Download the latest release and run it – literally double click it!
This is a new feature added as part of
WSL 2.4.4.If you don’t have this version at least, you can import via
wsl.exe --importinstead.
However, since I’m on an ARM device, I’ll need to build the NixOS image myself.
Building NixOS for ARM
The easiest way to build the NixOS WSL image for ARM is to:
- Temporarily install
UbuntuonWSL. - Install Nix.
- Clone the repo.
- Update the top level
flake.nixto targetaarch64-linux. - Do a
nix build. - Import the resulting image into
WSL.
Assuming not much changes in the future, you can just run the following commands:
wsl.exe --install # Defaults to Ubuntu
wsl.exe # Runs the default distribution, which is Ubuntu
Now just set a username and password for the Ubuntu user, then run the following commands:
curl -fsSL https://install.determinate.systems/nix | sh -s -- install --determinate
. /nix/var/nix/profiles/default/etc/profile.d/nix.sh
cd ~
git clone https://github.com/nix-community/NixOS-WSL.git
cd NixOS-WSL/
sed -i 's/system = "x86_64/system = "aarch64/g' flake.nix
nix build .#nixosConfigurations.default.config.system.build.tarballBuilder
sudo ./result/bin/nixos-wsl-tarball-builder
explorer.exe .
Double click, or wsl.exe --import --from-file ... and you should be able to boot into NixOS!
exit # Quit Ubuntu
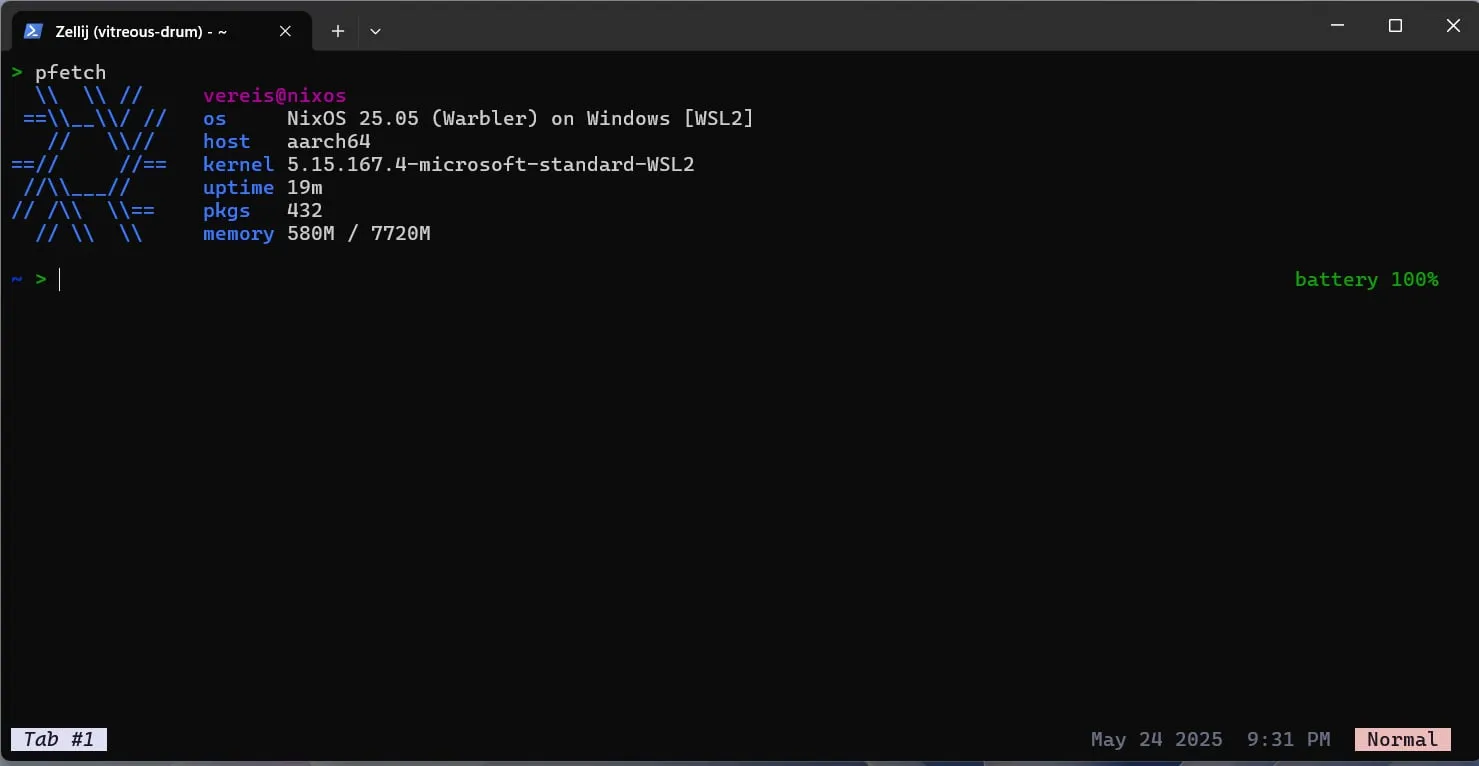
wsl.exe -d NixOS
sudo nix-channel --update && sudo nixos-rebuild switch
If that works, you should now have a working NixOS installation on WSL!
You can remove the
Ubuntudistribution if you want.Run
wsl.exe --unregister Ubuntuto do so.This should set
NixOSas the default distribution automatically. If it doesn’t, or you want to keepUbuntuaround, you can runwsl.exe -s NixOSto set it as the default.
Pulling my Configuration
Now that we have NixOS installed, we can pull my configuration from GitHub.
I keep my config in this repo.
If you have your own configuration, you probably know what to do. If you don’t, this probably isn’t the right place to start.
If you’re new to
NixOS, I recommend starting withflakesenabled.Check the
NixOS WSLmanual for a starting point.Otherwise, check out my post on NixOS for more notes.
For my setup, I just run the following commands:
nix-shell -p git
mkdir -p ~/git/vereis
cd ~/git/vereis
git clone https://github.com/vereis/nix-config.git
cd nix-config
sudo nixos-rebuild switch --flake .#homura
wsl.exe --shutdown
Yes, all my machines are named after Madoka Magica characters.
The next time you run wsl.exe, all the packages and configurations I need will installed including:
nvimwith my configuration.zshwith my configuration.gitwith my configuration.dockerenabled.
Everything just works on boot! Amazing!!
I manage project dependencies on a project-by-project basis with flakes, so I don’t need to install anything else.
Honestly, projects bootstrapping themselves on
cdis the best thing ever.Definitely recommend direnv for this, with their
nixintegration.
Minor Tweaks
Changing Login Dir
By default, WSL will start in your Windows home directory.
I actually can’t understand why this is the case, but you can change it three ways:
- Running
wsl.exe ~instead ofwsl.exe. - Changing the
Starting Directoryin theWindows Terminalsettings. - Update your
wsl.conffile to set the default user home directory.
I personally just update the Windows Terminal settings to point to my NixOS home directory, which is \\wsl$\NixOS\home\vereis.
Conclusion
And that’s it! You now have a fully functional NixOS development environment running on WSL2 on ARM.
This setup should allow you to do everything you need to do on the go, with the added benefit of having a UNIX development environment.
Hopefully, this post has been helpful in getting you started with setting up your own NixOS development environment on Windows 11!
Doubly so if you’re on ARM like me!